Widget Areas for LearnDash
by Dave Warfel on WordPress.org
Add unlimited blocks/widgets to several areas of LearnDash Focus Mode, plus course & group pages.
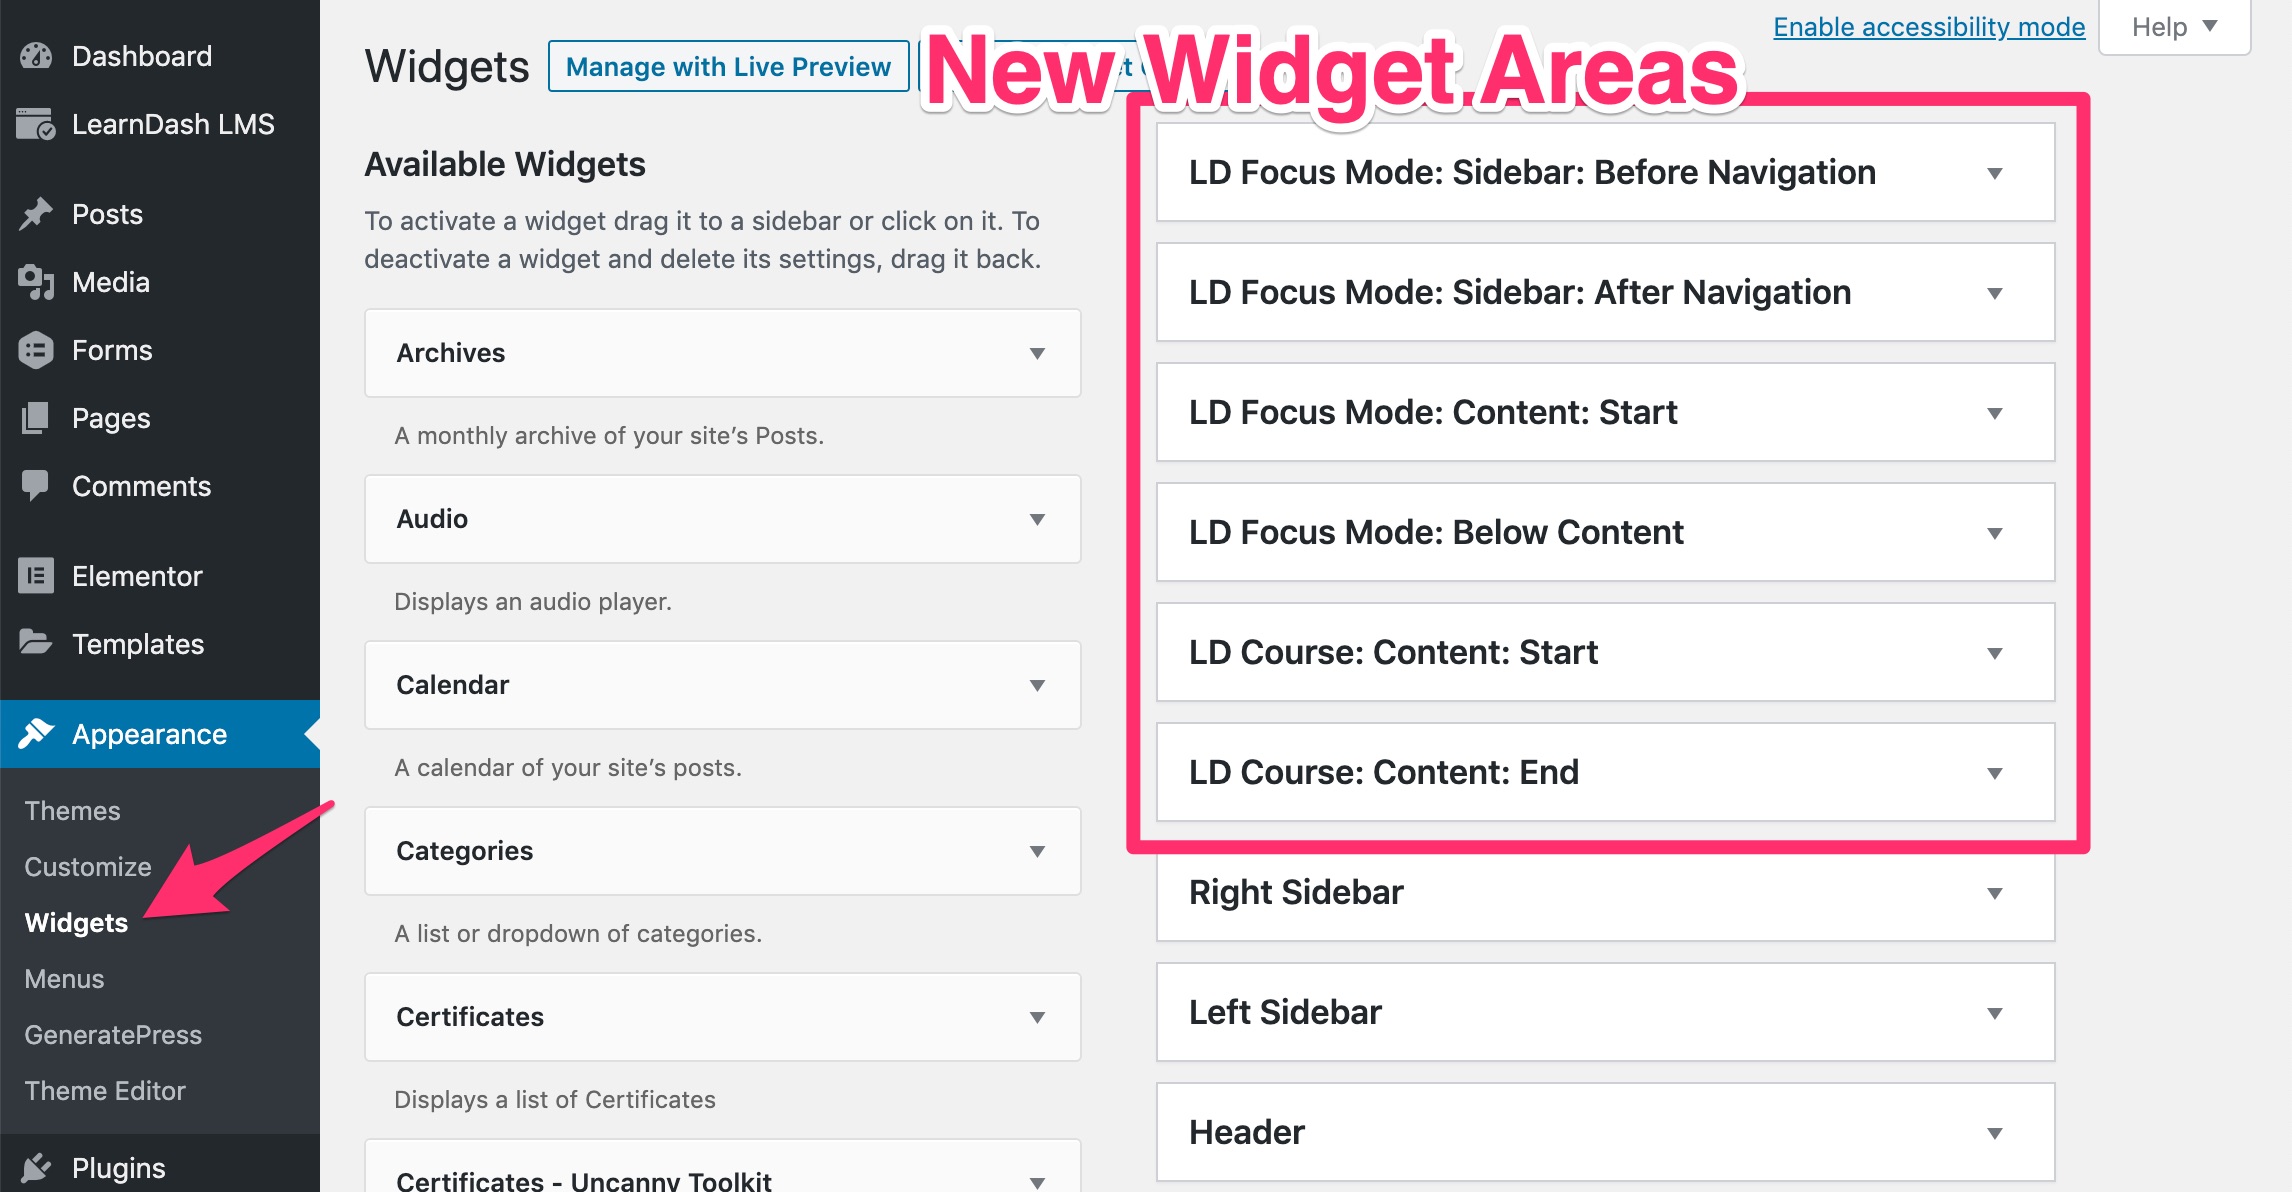
New LearnDash widget areas shown on the Appearance > Widgets screen
Widget Areas for LearnDash simply gives you more places to add custom content in LearnDash. By utilizing built-in LearnDash action hooks, we assign widget areas (also known as “sidebars”) to various locations throughout your LearnDash pages.
Available LearnDash Widget Areas
- Focus Mode: Sidebar: Above Navigation
- Focus Mode: Sidebar: Below Navigation
- Focus Mode: Content: Start
- Focus Mode: Below Content
- Course Page: Content: Start
- Course Page: Content: End
- Group Page: Content: Start
- Group Page: Content: End
Requires the “LearnDash 3.0” Active Template. Tested with LearnDash 4.23.
How to Use
Upon activating the plugin, new widget areas will appear on the Appearance > Widgets screen in your WordPress admin area. You can also access them via the Customizer (Appearance > Customize > Widgets).
Simply add the blocks/widgets you’d like to insert into the corresponding widget areas. Be sure to click the “Save” button at the bottom.
Navigate to a page that contains that widget area, refresh, and your new widgets will be there.
Types of Content to Add
WordPress comes with a set of default widgets, several of which might be useful. If you’re using the new block editor, all blocks will also be available to you.
- Add a simple Paragraph block with some basic text
- Add an Image or Video/Embed block for more visual content
- Add a Navigation Menu widget to insert a custom menu you’ve created
- Add your own Custom HTML widget to embed an
If you’re using Elementor Pro, you can create a custom section and embed it anywhere on your site, including in your new LearnDash widget areas. There are two ways to do this:
-
When you go to insert a block/widget, select the Elementor Library widget. Choose a template from the dropdown menu. Click “Save.”
-
Navigate to Templates > Saved Templates. Copy the shortcode next to the template you want to insert. Now you’ll insert a Shortcode block into the widget area, and paste the shortcode.
For more information, see the article in Elementor’s knowledge base.
Widget Area CSS Class Names
If you need to target the widget areas to apply custom styles using CSS, you can use the following class names.
All widget areas have the
.ldx-widget-areaclass.- Focus Mode: Sidebar: Above Navigation –
.ldx-widget-area.fm-nav-before - Focus Mode: Sidebar: After Navigation –
.ldx-widget-area.fm-nav-after - Focus Mode: Content: Start –
.ldx-widget-area.fm-content-start - Focus Mode: Below Content –
.ldx-widget-area.fm-content-bottom - Course Page: Content: Start –
.ldx-widget-area.course-content-start - Course Page: Content: End –
.ldx-widget-area.course-content-end - Group Page: Content: Start –
.ldx-widget-area.group-content-start - Group Page: Content: End –
.ldx-widget-area.group-content-end
Example Usage:
.ldx-widget-area.fm-nav-before { margin: 1em; }This would add 1em of spacing around the widget area that appears above the navigation in the Focus Mode sidebar.
In addition, all widgets placed inside of a widget area have a class of
.ldx-widget.Show/Hide Widgets on Certain Devices
While not a direct feature of this plugin, you can show/hide widgets on different devices using another free plugin.
- Install & activate the Widget Options plugin
- Navigate to the widget that you’d like to adjust the visibility on
- Scroll to the bottom and click on the tab with the mobile phone
- Choose to either show or hide on the checked devices
- Check the appropriate devices
- Click “Save”
Show/Hide Widgets on Specific Course/Lesson/Topic Pages
Another feature of the free Widget Options plugin (mentioned above) is to only show widgets on specific course, lesson, topic or quiz pages.
- Install & activate the Widget Options plugin
- Navigate to the widget that you’d like to adjust the visibility on
- Scroll to the bottom and click on the settings cog icon
- Click on the Logic tab
- In the text box, you can use the
is_single()conditional tag to only display that widget on a specific page - Use the ID of the course, lesson, topic or quiz
👉 How to find the ID of LearnDash content
Example:
This would only display the widget on the page with an ID of
7:is_single( '7' )If you wanted to display a widget on multiple pages (with IDs of 1, 2 and 3), your code would look like this:
is_single( array( 1, 2, 3 ) )There are many more WordPress conditional tags you can use.
From within WordPress
- Visit “Plugins > Add New”
- Search for “Widget Areas for LearnDash”
- Click the “Install” button
- Click the “Activate” button
- Navigate to “Appearance > Widgets” or open the Customizer to start adding blocks/widgets to your new widget areas
-